Sunday, 20 April 2014

Recipe Talk: Banana Cake

กลับมากันอีกแล้วกับสูตร "เค้กกล้วยหอม" หลังจากการเว้นว่างจากบล็อกสูตรอาหารและรีวิวร้านอาหารมานานหลายเดือนเนื่องจากภาระและหน้าที่หลายๆอย่าง สูตรเค้กกล้วยหอมนี้มีส่วนผสมของอบเชยป่น ถ้าใครไม่ชอบก็ไม่ต้องใส่ก็ได้นะคะ ถ้าพร้อมแล้ว มาดูส่วนผสมกันเลยดีกว่านะคะ


  • แป้งอเนกประสงค์ 230 กรัม
  • ผงฝู 2 & 1/2 ช้อนโต๊ะ
  • เกลือ 1/2 ช้อนชา
  • อบเชยป่น 1/2 ช้อนชา
  • น้ำตาลทราย 200 กรัม
  • เนยจืด 120 กรัม
  • ไข่ 2 ฟอง
  • วานิลลาสกัด 1 ช้อนโต๊ะ
  • กล้วยหอม 4 ใบ... บดละเอียด... กล้วยนี้ถ้ายิ่งสุกงอมมากเท่าไหร่ยิ่งทำให้เค้กหอมและอร่อยมากขึ้นนะคะ 
  • น้ำผึ้ง 1 ช้อนโต๊ะ

เมื่อมีส่วนผสมพร้อมแล้ว เรามาเริ่มกันเลยค่ะ

  1. อุ่นเตาอบไว้ที่ 190 องศา และเหมือนเดิมคือนำเนยเพียงเล็กน้อยทาด้านในของแม่พิมพ์ขนมปังค่ะ 
  2. นำแป้งอเนกประสงค์ ผงฟู เกลือ และอบเชยป่นมาผสมให้เข้ากัน และพักไว้ๆข้างๆ
  3. ตีเนยและน้ำตาลให้เข้ากันในชามอีกใบหนึ่ง เมื่อตีจนส่วนผสมเนียนแล้ว ใส่ไข่ วานิลลาสกัด และน้ำผึ้งลงไปและผสมจนเนียนเข้ากันดี แล้วจึงค่อยผสมกล้วยหอมบดลงไป
  4. ผสมส่วนผสมแห้งและเปียกเข้าด้วยกัน เอาพอแค่ให้เข้ากันนะคะ ใช้ไม้พายในการผสมจะดีที่สุดค่ะ
  5. เทส่วนผสมเค้กลงในแม่พิมพ์ขนมปัง และน้ำเข้าเตาอบประมาณ 25 นาที หลังจาก 25 นาทีแล้วให้ลดอุณหภูมิลงเหลือ 150 องศาและอบต่ออีก 15 นาที 
  6. อบเสร็จแล้ว ก็นำออกมาแล้วปล่อยให้เย็นสักหน่อย และทานตอนอุ่นๆค่ะ

ใครลองทำหรือทานเค้กกล้วยหอมสูตรนี้แล้ว อย่าลืมแชร์ความคิดเห็นกับบัวได้ทางด้านล่างนี้นะคะ

จนกว่าจะถึงคราวหน้า ขอให้สนุกกับการทำอาหารค่ะ <3 <3 <3 

* --- * --- * --- * --- * --- * --- * --- * --- * --- * --- * --- * --- *

Hello there! It has been months since I last blogged anything at all. I have made a come back with an easy recipe, Banana Cake. The soft and moist banana cake gives you this homey feeling. If you are ready, here are things you need.

  • 230 g All Purpose Flour
  • 2 & 1/2 Tablespoons Baking Powder
  • 1/2 Teaspoon Salt
  • 1/2 Teaspoon Ground Cinnamon 
  • 200 g Granulated Sugar
  • 120 g Unsalted Butter
  • 2 Large Eggs
  • 1 Tablespoon Vanilla Extract
  • 4 Medium to Large Bananas, Mashed 
  • 2 Tablespoons Honey

Once you have all the ingredients, let's get started

  1. Start by preheating your oven to 190 Celsius. Grease your loaf tin or line it with parchment paper. 
  2. Dry Mixture. Mix all purpose flour, baking powder, salt and cinnamon together, Set aside. 
  3. Wet Mixture. Cream together unsalted butter and sugar until smooth, then add eggs, vanilla extract and honey in. Stir well. Lastly add, mashed bananas and mix well.
  4. Cake Mixture. Add dry mixture to wet mixture and use spatular to combine them. Do not over mix.
  5. Pour the cake mixture into your loaf tin and bake in the oven for 25 minutes. Then after 25 minutes is up, lower the temperature to 150 Celsius and bake for another 15 minutes. 
  6. Once done baking, leave the cake to cool down a little and eat a slice or two while warm. 

If you have tried this recipe and have any suggestion, like always, please feel free to leave your comments below. 

Until next time, stay full and stay happy. <3 <3 <3 

Wednesday, 22 January 2014

Recipe Talk: Baby Clam Pasta

บัวเป็นคนชอบหอยลายและเป็นคนชอบทานคาร์โบไฮเดรตเป็นที่สุด นี้เป็นเหตุผลที่อาหารเย็นวันนี้เป็น พาสต้าหอยลาย ทำได้ง่ายและใช้เวลาไม่ถึงครึ่งชั่วโมง 


สูตรนี้บัวทำทานสำหรับ 3 คนนะคะ ปรับเพิ่มหรือลดได้ตามจำนวนคนทาน ใครสนใจสูตรนี้ก็เตรียมส่วนผสมตามด้านล่างนี้เลยค่ะ

  • พาสต้าแบบเส้น (บัวเลือกเส้นลิงกวินี) 210 กรัม 
  • หอยลาย 150 กรัม
  • เนยเค็ม 40 กรัม
  • หอมเล็ก 1 หัว (ประมาณ 30 กรัม) หั่นเป็นลูกเต๋าเล็กๆ
  • กระเทียม 6 กลีบ (ประมาณ 25 กรัม) สับค่อนข้างละเอียด
  • ไวน์ขาว 100 มิลลิลิตร
  • พาสลีย์แห้ง 1 ช้อนชา
  • พริกแห้ง 1/4 ช้อนชา
  • เกลือ 1/2 ช้อนชา
  • พริกไทยดำป่น 1/2 ช้อนชา
เมื่อมีของพร้อมแล้วก็เริ่มกันเลยค่ะ
  1. ต้มเส้นพาสต้าในน้ำเดือดที่เติมเกลือลงไปผสมแล้ว ต้มตามจำนวนนาทีที่ระบุไว้ข้างกล่อง
  2. ผัดหอมกับเนยในกระทะประมาณ 2 นาที แล้วจึงใส่กระเทียมลงไปและผัดจนกระเทียมหอม เมื่อกระเทียมหอมได้ทีแล้วก็ใส่หอยลายลงไปผัดอีกสัก 2 ถึง 3 นาที
  3. เทไวน์ขาวลงไปและเพิ่มความร้อนให้ไวน์เดือด แล้วจึงลดไฟและเคี่ยวสัก 2 ถึง 3 นาที หลังจากนั้นก็ใส่พาสลีย์แห้ง พริกป่น เกลือ และพริกไทยดำป่นลงไป คนให้เข้ากัน
  4. นำเส้นพาสต้าที่สุกแล้วลงไปผสมกับหอยลาย คลุกเคล้าให้เข้ากัน และเสริฟตอนยังร้อน

เพียงง่ายๆแค่นี้ เพื่อนๆก็ได้ทานพาสต้าหอยลายได้ภายในเวลาไม่ถึงครึ่งชั่วโมง ไม่เลวเลยใช่ไหมคะ ถ้าใครลองทำตามสูตรแล้วมีข้อแนะนำ ก็บอกบัวได้ทางด้านล่างนี้เลยนะคะ

จนกว่าจะถึงคราวหน้า ขอให้สนุกกับการทำอาหารค่ะ <3 <3 <3

* --- * --- * --- * --- * --- * --- * --- * --- * --- * --- * --- * --- *

I love baby clams and I love carbohydrate... I am not gonna lie about it. This is the reason why I have come up with "Baby Clam Pasta" (or to be more fancy Pasta alle Vongole) for dinner. I easily finished this dinner for 3 people in less than half an hour. If you are intereseted, here are things you need.


  • 210 g String Pasta (I used linguine)
  • 150 g Baby Clams
  • 40 g Salted Butter
  • 1 Shallot, Diced (approx 30 g)
  • 6 Garlic Cloves, Minced (approx 25 g)
  • 100 ml White Wine
  • 1 Teaspoon Dry Parsley
  • 1/4 Teaspoon Chili Powder
  • 1/2 Teaspoon Salt
  • 1/2 Teaspoon Ground Black Pepper

Once you have everythig, let's see what you need to do.

  1. Cook pasta in salted boiling water according to the instruction. 
  2. Heat salted butter in a large skillet, and cook shallot for around 2 minutes and then add garlic. Saute until garlic gives you this nice smell and then add baby clams. Cook for another 2 to 3 minutes.
  3. Add white wine and turn the heat up until you see it bubbling. Turn down the heat and let simmer for a minute or two and then add dry parsley, chili powder, salt and black pepper. Adjust the chili powder according to your liking.
  4. Transfer drained string pasta into the baby clam mixture. Toss to coat well. Serve while hot.

There you go. Quick and easy dinner in less than half and hour. If you decide to give this recipe a go, please let me know what you think in the comment section below.

Until next time, stay full and stay happy. <3 <3 <3

Wednesday, 1 January 2014

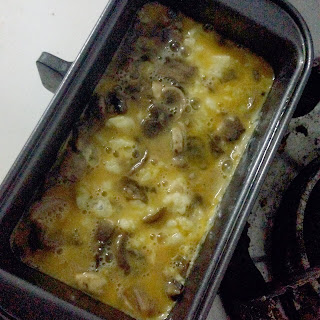
Recipe Talk: Mushroom Frittata

สวัสดีปีใหม่ 2014 ค่ะ หลังจากห่างหายการบล็อกไปพักใหญ่เนื่องจากป่วยและไม่ได้อยู่บ้าน บัวกลับมาพร้อมกับสูตรอาหารเช้า "ฟริตาต้าเห็ด" อาหารเช้าจานนี้เหมาะกับการทานตอนทำเสร็จใหม่ๆและกำลังร้อนๆค่ะ 


พร้อมแล้วรึยังคะ เรามาเริ่มจากส่วนผสมกันเลยดีกว่า

  • เห็ด (จะชนิดใดก็ได้ พอดีบัวมีเห็ดแชมปิญอง) 200 กรัม
  • หอม (เช่นกันค่ะ ชนิดใดก็ได้ พอดีมีหอมแดงเลย) 50 กรัม
  • ไวน์ขาว 1 ช้อนโต๊ะ
  • กระเทียมป่น 1 ช้อนโต๊ะ
  • พริกไทยดำป่น 1/4 ช้อนโต๊ะ
  • เกลือ 1/4 ช้อนชา
  • เนย 1 ช้อนชา
  • ไข่ 2 ฟอง
  • นม 2 ช้อนโต๊ะ (ประมาณ 28 มิลลิลิตร)
  • ชีสเชดด้าแบบฉีก (ซื้อแบบก้อนมาหั่นเป็นชิ้นเล็กๆหน่อยก็ได้ค่ะ) 20 กรัม
  • เกลือและพริกไทยดำป่นอีกนิดหน่อยสำหรับปรุงรสส่วนผสมไข่

พร้อมแล้วเริ่มกันเลยนะคะ

  1. อุ่นเตาอบไว้ที่ 200 องศา 
  2. ในกระทะใบเล็ก ผัดเห็ด หอม ไวน์ขาว กระเทียมป่น พริกไทยดำป่น เกลือ เนย และนมจนน้ำงวดและหอมเปลี่ยนเป็นใสๆ ผัดเสร็จก็พักไว้ เรื่องความเค็มก็ปรับได้ตามใจชอบ พอดีบัวชอบทานเค็มนะคะ 

  3. ตีไข่และชีสเชดด้าเข้าด้วยกัน ปรุงรสด้วยพริกไทยและเกลือ ไม่ต้องมาก เอาแค่ให้พอมีรส เนื่องจากว่าเห็ดเราเค็มอยู่แล้วค่ะ


  4. ถ้าใครเหมือนบัว ไม่ได้มีกระทะที่เข้าเตาอบได้ ก็ให้ใช้พิมพ์โลฟแทนได้ค่ะ เริ่มจากการเอาส่วนผสมเห็ดวางกระจายให้ทั่วก้นพิมพ์โลฟ แล้วค่อยเทส่วนผสมไข่ให้มิดส่วนผสมเห็ดค่ะ แต่ถ้าใครมีกระทะที่เข้าเตาอบได้ก็ยิ่งง่ายเลย หลังจากที่ผัดเห็ดเสร็จแล้วก็เทส่วนผสมไข่ลงไปในกระทะเดียวกัน แล้วก็นำเข้าอบ


  5. อบฟริตาต้าประมาณ 20 นาที ทานตอนยังร้อนค่ะ

ถึงจะดูเหมือนใช้เวลา แต่จริงๆแล้ว แค่เสียเวลาตอนอบเท่านั้นค่ะ อ่อ เกือบลืมบอก สูตรนี้ไว้สำหรับทานคนเดียวนะคะ ถ้าอยากทำมากกว่า 1 คนก็ให้คูณส่วนผสมตามจำนวนคนค่ะ ถึงจะดูเหมือนเยอะ แต่ก็เป็นอาหารเช้าที่ทำให้อิ่มแต่ไม่แน่นท้อง ลองสูตรนี้แล้วมีความเห็นหรือข้อติชมยังไงก็บอกบัวได้ทางด้านล่างนะคะ 

จนกว่าจะถึงคราวหน้า ขอให้สนุกกับการทำอาหารค่ะ <3 <3 <3

* --- * --- * --- * --- * --- * --- * --- * --- * --- * --- * --- * --- *

After not blogging for quite a while due to health and personal reasons, I am now back with a new breakfast recipe, "Mushroom Frittata". What would be a better way to start the first recipe in 2014 than a nice frittata recipe, right? 


This breakfast is not a grab-and-go kind, but you can premake it for reheating in the morning. I do suggest eating your frittata right after making and while hot. Enough... Let's see what you need to make this breakfast.

  • 200 g Mushrooms, Sliced
  • 50 g Onion (any type of onion is fine), Sliced 
  • 1 Tablespoon of White Wine
  • 1 Tablespoon of Garlic Powder 
  • 1/4 Tablespoon of Ground Black Pepper
  • 1/4 Teaspooon of Salt
  • 1 Teaspoon of Butter
  • 2 Eggs
  • 2 Tablespoons (28 ml) of Milk
  • 20 g Shredded Cheddar Cheese
  • Little bit more Salt and Pepper

Once you have everything, these are the steps you need to follow.

  1. Preheat oven to 200 Celsius
  2. In a small skillet, saute mushrooms, onion, white wine, garlic powder, ground black pepper, milk, butter and salt together until onion pieces become clear. Adjust the saltiness according to your liking... I apparently like salty food. Set aside.
  3. In a small bowl, whisk together eggs, cheddar cheese, salt and a little bit of ground black pepper until combine.
  4. If you are like me and have no skillet that is oven safe, simply use the loaf pan. I use a small one. What I do is I spread the mushroom mixture aroud loaf pan and then pour in the egg mixture to cover. If you are one of those people who have oven safe skillets, simply use that skillet to saute your mushroom and then pour the egg mixture to cover the mushroom.
  5. Bake mushroom frittata for 20 minutes. Serve while hot.

This recipe is for one person, so if you would like to make this frittata for more than just yourself, simply times the ingredients by the number of people you would like to make this for. I love this recipe because it is filling and tasty. If you have tried the recipe and have any suggestion and comment, please let me know in the comment section below.

Until next time, stay full and stay happy. <3 <3 <3

Tuesday, 3 December 2013

Recipe Talk: Lemon Butter Cookies

เลมอนเป็นสิ่งที่บัวจะมีติดตู้เย็นที่บ้านไว้เสมอ เพราะใช้ง่าย ใช้กับอาหารก็ได้ ใช้กับเครื่องดื่มก็ได้ วันนี้บัวเลยคิดว่าอยากจะแชร์สูตร บัตเตอร์คุกกี้เลมอน กับเพื่อนๆ เป็นสูตรที่ใช้ของน้อยมาก และที่สำคัญทั้งหอมและอร่อย 


สูตรของบัวได้ถูกปรับมาจากสูตร Lemon Butter Cookies ของ Meghan Reckling แห่ง A Taste of Meghan's Kitchen ถ้าเพื่อนๆสนใจ ก็เตรียมของดังนี้เลยค่ะ

สำหรับคุกกี้
  • แป้งอเนกประสงค์ 160 กรัม
  • น้ำตาล 75 กรัม
  • ผิวมะนาว (ขูดเป็นเส้นเล็กๆ) 3 ช้อนโต๊ะ
  • เนยจืด 215 กรัม ตัดเป็นก้อนประมาณ 1 นิ้ว และแช่เย็นไว้
  • ไข่แดง 1 ฟอง
สำหรับเกลส
  • น้ำตาลไอซิ่ง 80 กรัม
  • น้ำเลมอน 1 ช้อนโต๊ะ
  • วานิลลาสกัด 1 ช้อนชา
ถ้ามีของครบแล้ว เรามาเริ่มกันเลยนะคะ 
  1. อุ่นเตาอบไว้ที่ 180 องศา และวางกระดาษอบขนมไว้บนถาดอบขนม
  2. ผสมแป้งอเนกประสงค์ น้ำตาล และผิวมะนาวเข้าด้วยกัน หลังจากนั้นนำเนยก้อนๆมาใส่ลงไปและเริ่มใช้มือบี้ผสมกันจนได้ส่วนผสมที่เหมือนผงขนมปังหรือทรายหยาบ พอได้ประมาณนั้นแล้วก็ใส่ไข่แดงลงไป ใช้มือบี้ผสมให้เข้ากันกับส่วนผสมทั้งหมด เมื่อได้ที่แล้วก็นำไปพักไว้ในตู้เย็นประมาณ 30 นาที

  3. ระหว่างรอก็ทำเกลสเตรียมไว้ ผสมน้ำตาลไอซิ่ง น้ำเลมอน และวานิลลาสกัดเข้าด้วยกันให้เนียนและพักไว้
  4. หลังจาก 30 นาที นำส่วนผสมคุกกี้ออกมาจากตู้เย็น ใช้มือปั้นคุกกี้เป็นก้อนเล็กๆวางไว้บนถาดอบขนม น่าจะปั้นได้สัก 8 ก้อนต่อ 1 ถาด คุกกี้ที่เหลือทียังไม่ได้ปั้นให้เก็บไว้ในตู้เย็นก่อน หลังจากนั้นก็ใช้ส้อมกดก้อนคุกกี้ตามแนวขวางและต่อด้วยตามแนวตั้ง 


  5. อบคุกกี้ประมาณ 12 นาที เมื่ออบเสร็จให้ปล่อยให้เย็น

  6. ใช้ช้อนเล็กๆราดเกลสไปบนคุกกี้ที่เย็นแล้ว และปล่อยให้เกลสแข็งตัวก่อนเก็บเข้าภาชนะสูญญากาศ
ง่ายใช่ไหมคะ ทั้งกลิ่นและรสบางๆของเลมอนในบัตเตอร์คุกกี้เลมอนนี้ทำให้ความอร่อยมากขึ้นอีก ใครลองทำดูแล้วมีความคิดเห็นยังไง บอกกันได้นะคะ ที่คอมเม้นด้านล่างค่ะ

จนกว่าจะถึงคราวหน้า ขอให้สนุกกับการทำอาหารนะคะ <3 <3 <3

* --- * --- * --- * --- * --- * --- * --- * --- * --- * --- * --- * --- *

Lemons are something I always have in my refridgerator. I thought I could share with you a simple cookie recipe that is delicious and easy to do. I came across Lemon Butter Cookies by Meghan Reckling of A Taste of Meghan's Kitchen. I have made a bit of changes, but here is what I use and how I bake my version of Lemon Butter Cookies. Start off with things you will need.

For Cookies

  • 160 g All Purpose Flour
  • 75 g Sugar
  • 3 Tablespoons of Lemon Zest
  • 215 g Unsalted Butter, Diced into 1 inch cube, Cold
  • 1 Egg Yolk

For Glaze

  • 80 g Icing Sugar
  • 1 Tablespoon of Lemon Juice
  • 1 Teaspoon of Vanilla Extract

Once you have everything, let's get started.
  1. Preheat your oven to 180 Celsius. Line your baking tray with parchment paper.
  2. Mix together all purpose flour, sugar and lemon zest. Then throw in unsalted butter cubes and start working it with your hand until you get the consistency of bread crumbs or wet sand. After that, add egg yolk to the crumbs and start blending until you get a nice dough. Chill the dough in the refridgerator for 30 minutes.
  3. Meanwhile work on the glaze, beat together icing sugar, lemon juice and vanilla extract until they are well combined. Set aside.
  4. After 30 minutes, remove the dough from the refridgerator and start forming little balls and place on the baking tray. Use a fork to create a fork print effect on each cookie ball. If you cannot bake all cookies dough at once, store in the refrigerator while the previous batch is being baked.
  5. Once the fork print process is done, bake the cookis for 12 minutes. After 12 minutes, remove from tray and let them cool.
  6. Drizzle the glaze over the cookies and let the glaze harden before store in airtight containers.

Give this recipe a try. Lemony smell and flavor make these cookies soooooo nice! Let me know what you think of the recipe down below.

Until next time, stay full and stay happy. <3 <3 <3 

Monday, 2 December 2013

Restaurant Review: Stamina-En @ Nihonmachi

บัวเป็นคนที่มักจะหาที่ทานเนื้อ ไม่ว่าจะเป็นเนื้อย่าง ซูชิเนื้อ ข้าวหน้าเนื้อ สเต็กและรูปแบบอื่น บอกตรงๆเลยว่าเป็นคนรักเนื้อและการทานเนื้อ แต่ประมาณปีสองปีที่แล้วบัวพยายามทานเนื้อย่างให้น้อยลงเพราะเหตุผลทางสุขภาพ แต่วันนี้ขอเว้นไว้หนึ่งวันแล้วทำตามใจตัวเองสักหน่อย เลยเลือกไปทานที่ Stamina-En ที่อยู่ชั้น 2 ของ Nihonmachi ซอยสุขุมวิท 26 ต้องบอกเลยว่าไม่ผิดหวังแม้แต่น้อยและกลับบ้านมาด้วยความสุข การบริการที่กระตือรือร้นและสุภาพเป็นข้อที่บัวชอบของที่นี้ คงปฏิเสธไม่ได้ว่าบัวไม่ได้ไปร้านอาหารแค่หวังอยากทานอาหารที่อร่อยเท่านั้น ปัจจัยอื่นก็สำคัญกับการมีประสบการณ์ที่ดีกับร้านนั้นๆด้วย จริงไหมคะ มาต่อกันดีกว่า นอกเรื่องไปซะหน่อย การรีวิวนี้เป็นการรีวิวสั้นๆที่เน้นรูปมากกว่าการเขียน คุณภาพอาหารบ่งบอกในแต่ละคำที่บัวทาน และขอบอกเลยว่ามีความสุขมากที่ได้ลิ้มลอง แต่ร้านนี้ก็ยังไม่ข้อที่บัวไม่ได้ปลื้มมากมายนัก ก็เห็นจะเป็นเรื่องเตา ไฟแรงไปนิด แต่อันนี้ก็เป็นความชอบส่วนบุคคลของแต่ละคนนะคะ และแล้วเราก็มาถึงส่วนที่ดีที่สุดของการรีวิวนี้ รูปอาหาร! อ้อเกือบลืมบอก บัวสั่งเนื้อไปทั้งหมด 5 จานและมีกับแกล้มอื่นๆอีก 2 - 3 อย่างราคาทั้งหมดก็อยู่ที่ประมาณ 1,841.42 บาทค่ะ (ได้รับส่วนลด 30% จากยอดเต็มเดิม 2,458.50 บาท) 

I always look for places I can enjoy my beef in all forms. A year or two ago, you can usually find me eating grilled beef, but lately, I have been trying to stay off it for health reasons. I made an exception today and headed to Stamina-En, the one on the 2nd floor of Nihonmachi. Not only that I did not regret my decision, I was happy and impressed. The enthusiatic and tentative service of the waitors and waitresses is a big plus factor for me. After all, you are not just there for the food right? This is just gonna be a quick review with more food pictures than with more words. The quality of the beef was reflected in every bite I took and I was so happy. The only downside would probably be the heat of the grill. It is a bit too strong to grill the beef. You can either undercook or overcook. However, this depends on how each individual likes the grill. Ok now the best part... pictures! Enjoy! Almost forget to tell you guys that we ordered 5 beef dishes and a few side dishes and the total bill was 1,841.42 baht (we received 30% discount from 2,458.50 baht). 

Gyu Tan ลิ้นวัว
Tokujo Tan ลิ้นวัวพิเศษ 
Karubi 
Aka Mix

Harami ^___^

The Bill
หวังว่าจะชอบรุปกันนะคะ จนกว่าจะถึงคราวหน้า ขอให้สนุกกับการทานอาหารนะคะ <3 <3 <3

I hope you like the pictures. Until next time, stay full and stay happy. <3 <3 <3

Friday, 29 November 2013

Recipe Talk: Blueberry Banana Muffins

ด้วยสถานการณ์ตอนนี้ทำให้การเดินทางใช้เวลามากขึ้น คุณอาจต้องวางแผนเส้นทางในการไปทำงาน หรือรถอาจจะติดมากขึ้น ไม่ว่าจะด้วยอะไรก็ตาม อาหารเช้าที่คุณสามารถเตรียมไว้ล่วงหน้าและหยิบฉวยไปทางบนรถหรือที่ทำงานตอนเช้าได้นั้นเป็นความคิดที่ไม่เลวเลยใช่ไหมคะ 


บัวมีสูตร มัฟฟินบลูเบอร์รี่กล้วย มาให้เพื่อนๆลองทำไว้ทานตอนเช้า (หรือจะไว้ทานตอนสายๆหรือบ่ายก็ได้ตามต้องการ) สิ่งที่เพื่อนๆต้องใช้มีดังนี้ค่ะ

  • แป้งอเนกประสงค์ 50 กรัม
  • โอ๊ต 50 กรัม
  • น้ำตาลทรายแดง 35 กรัม
  • ผงฟู  1/2 ช้อนชา
  • เบกกิ้งโซดา 1/4  ช้อนชา
  • เกลือ 1/8 ช้อนชา
  • นมอัลมอนด์ (หรือนมชนิดใดก็ได้) 60 มิลลิลิตร
  • น้ำมันพืช 15 มิลลิลิตร
  • ซอสแอปเปิ้ล 50 กรัม
  • วานิลลาสกัด 1 ช้อนชา
  • ไข่ 1 ฟอง
  • กล้วยบด 1 ลูก
  • บลูเบอร์รี่ 40 กรัม

มีของครบแล้ว เริ่มกันเลยนะคะ

  1. ก่อนอื่นก็ต้องอุ่นเตาอบ ตั้งอุณหภูมิไว้ที่ไว้ที่ 200 องศา แล้วก็เตรียมแม่พิพม์มัฟฟินโดยการเอาถ้วยอบกระดาษวางรองไว้ในแต่ละหลุมหรือเอาน้ำมันทาแทน
  2. นำแป้งอเนกประสงค์ โอ๊ต ผงฟู เบกกิ้งโซดา และเกลือมาคลุกเคล้ากัน
  3. ตีนมอัลมอนด์ ซอสแอปเปิ้ล วานิลลาสกัด และไข่ให้เข้ากัน และพักไว้
  4. ผสมส่วนผสมแห้งและส่วนผสมเปียกเอาแค่พอให้เข้ากัน และหลังจากนั้นก็ใส่กล้วยบดและบลูเบอร์รี่เข้าไป ผสมให้ทั่ว
  5. ตักส่วนผสมแบ่งแต่ละหลุม บัวแบ่งได้ 4 หลุมพอดีค่ะ 
  6. อบมัฟฟินประมาณ 15 - 18 นาทีหรือเอาเท่าที่ไม้จิ้มฟันจิ้มออกมาแล้วสะอาดไม่มีเศษมัฟฟินติดออกมา


สูตรนี้ทำง่ายใช่ไหมคะ ถ้าใครชอบกลิ่นของกล้วยเหมือนบัวแล้วละก็ สูตรนี้ทำให้ห้องครัวหอมเป็นกลิ่นนี้กันเลยทีเดียว ลองสูตรนี้แล้วยังไง ติชมหรือแนะนำได้นะคะ 

จนกว่าจะถึงคราวหน้า ขอให้สนุกกับการทำอาหารค่ะ <3 <3 <3

* --- * --- * --- * --- * --- * --- * --- * --- * --- * --- * --- * --- *

With the current situation in Bangkok, it takes more time to travel to work or wherever in the morning. The grab-and-go breakfast ideas seem ideal at the moment. I have come up with Blueberry Banana Muffins that you can premake the night before and grab to eat while in traffic or at work. It takes less than 20 minutes to come up with these gorgeous stomach-filling breakfast muffins. If you are interested, here are the things you need.

  • 50 g All Purpose Flour
  • 50 g Oats
  • 35 g Brown Sugar
  • 1/2 Teaspoon Baking Powder
  • 1/4 Teaspoon Baking Soda
  • 1/8 Teaspoon Salt
  • 60 ml Almond Milk
  • 15 ml Vegetable Oil
  • 50 g Applesauce
  • 1 Teaspoon Vanilla Extract
  • 1 Egg
  • 1 Banana, Mashed
  • 40 g Blueberries

If you have everything, here are how to make the muffins.

  1. First thing first, preheat your oven to 200 celsius. Either line your muffin pan with cupake or muffin liners or greese the pan.
  2. Dry mixture. Combine all purpose flour, oats, brown sugar, baking powder, baking soda and salt together. Set aside.
  3. Wet mixture. Whisk together almond milk, vegetable oil, applesauce, vanilla extract and egg.
  4. Muffin mixture. Add dry mixture to the wet mixture and combine well. Then add mashed banana and blueberries (if you want more berries or more banana, go ahead and add them in). Toss to cover. 
  5. Scoop your muffin mixture into your muffin pan. The number of muffins depend on how you will divide the batter. I have 4 muffins at the end. 
  6. Bake for 15 to 18 minutes or until the toothpick comes out clean. 

Easy right? If you adore bananas like I do, you seriously will love how your kitchen smells after the baking session is done. Let me know how you like these muffins. 

Until next time, stay full and stay happy. <3 <3 <3

Thursday, 28 November 2013

Recipe Talk: Mushroom Stroganoff

บัวเป็นคนนึงที่ชื่นชอบบีฟสโตรกานอฟมาก การได้ทานบีฟสโตรกานอฟร้อนๆกับพาสต้าสักถ้วยถือเป็นของขวัญสำหรับบัวกันเลยทีเดียว รู้อย่างนี้แล้วเพื่อนๆคงจะไม่แปลกใจกับความตื่นเต้นของบัวที่ได้เจอสูตร สโตรกานอฟเห็ด ของ Gina Homolka แห่ง Skinny Taste เห็ดจะมีเนื้อสัมผัสและกลิ่นที่คล้ายคลึงกับเนื้อ เพราะฉะนั้นสโตรกานอฟเห็ดนี้เปรียบเสมือนการได้ลิ้มลองบีฟสโตรกานอฟแบบแคลอรี่ต่ำ ส่วนที่แตกต่างไปจากสูตรดั้งเดิมคือ แทนที่จะใช้เห็ดที่สูตรบอก บัวใช้เห็ดหอม เห็ดแชมปิญอง กับเห็ดพอชินี่แบบแห้งเพราะบัวหาเห็ดตามสูตรไม่ได้ ออกมาก็อร่อยไม่เบาเลยทีเดียว การใช้เห็ดพอชินี่แบบแห้ง เพื่อนๆก็ต้องนำเห็ดไปแช่น้ำเปล่าให้เห็นบานตัว ไม่ต้องทิ้งน้ำแช่เห็ดนะคะ เอาไปใช้กับสูตรได้ สูตรนี้ใช้เวลาไม่ถึงชั่วโมง นับตั้งแต่เตรียมส่วนผสม ไปจนถึงทำสโตรกานอฟเห็ดเสร็จพร้อมเสริฟค่ะ 


I have always loved Beef Stroganoff and I was super duper thrilled to find Mushroom Stroganoff by Gina Homolka of Skinny Taste. I found the recipe a couple of weeks ago, but I never had a chance to recreate the dish. I was super thrilled to share my experience of Mushroom Stroganoff with you guy. First thing first, since I could not find the cremini and baby bella mushrooms, I went for champion, shiitake and dried porcini mushrooms instead. Apart from that, I followed the recipe. The outcome was a heaven in a bowl. You should seriously considering trying this recipe. It will not take you more than an hour from preping everything to getting the Mushroom Stroganoff done.