Thursday, 21 November 2013

Recipe Talk: Fudge Brownies

สวัสดีค่า กลับมาแล้วหลังจากห่างหายการบล๊อกไปซะหลายวัน กลับมาคราวนี้มาพร้อมกับสูตร "ฟัดจ์บราวนี่" ที่บัวทำให้เพื่อนๆและครอบครัวได้ทานกันค่ะ บัวปรับสูตรนี้มาจากสูตร Fudgy Brownie ของเชฟยูทูปคนโปรดของบัว เชฟ Laura Vitale และสูตร Best Cocoa Brownies จาก Smitten Kitchen


ถ้าใครชอบบราวนี่ที่มีผิวกรอบบางๆด้านบนและเนื้อที่แสนนุ่มและฉ่ำไปด้วยช็อกโกแลต ก็เตรียมของได้ตามด้านล่างนี้เลยค่ะ

  • เนยจืด (ทิ้งไว้ที่อุณหภูมิห้อง) 200 กรัม
  • ช็อกโกแลตดำ (ละลายแล้ว) 200 กรัม .... การละลายช็อกโกแลต บัวทำโดยการนำเข้าไมโครเวฟ 40 วินาที
  • น้ำตาล 250 กรัม
  • นม 75 มิลลิลิตร
  • วานิลลาสกัด 2 ช้อนชา
  • เกลือ 1/4 ช้อนชา
  • ผงฟู 1/2 ช้อนชา
  • ผงโกโก้ 80 กรัม
  • ไข่ไก่ (แช่เย็น) 3 ฟอง
  • กาแฟผง 1/2 ช้อนชา
  • แป้งอเนกประสงค์ 70 กรัม
  • ถั่ววอลนัท 80 กรัม
  • ช็อกโกแลตชิพขาว 70 กรัม

เตรียมของพร้อมแล้ว เรามาเริ่มกันเลยค่ะ

  1. อุ่นเตาไว้ที่ 170 องศา และก็เตรียมถาดอบบราวนี่โดยการเอาน้ำมันทาด้านในให้รอบหรือจะใช้สเปรย์น้ำมันฉีดก็ได้ค่ะ แล้วก็น้ำกระดาษสำหรับอบขนมมาวางไว้ด้านใน
  2. เริ่มทำส่วนผสมแห้งโดยนำเกลือ ผงฟู แป้งอเนกประสงค์ กาแฟผง และผงโกโก้มาผสมกันในถ้วย และตั้งพักไว้
  3. ต่อมาก็ทำส่วนผสมเปียก นำเนยและน้ำตาลมาตีให้เข้ากันจนฟู แล้วจึงเทไข่ วานิลลาสกัด และนมลงไปแล้วตีให้เข้ากัน ท้ายสุดจึงนำช็อกโกแลตดำแบบเหลวเทผสมลงไปและตีให้เข้ากัน
  4. นำส่วนผสมแห้งและส่วนผสมเปียกมาผสมกัน เอาแค่พอให้เข้ากัน ถ้าตีแป้งมากจนเกินไป เพื่อนๆจะได้บราวนี่ที่เหนียวค่ะ หลังจากนั้นก็นำถั่ววอลนัทและช็อกโกแลตชิพขาวมาคลุกเคล้าให้เข้ากัน
  5. เทส่วนผสมบราวนี่ลงในถาดที่เตรียมไว้ และนำไปอบ 45 นาที เอาแค่พอถ้าเอาไม้จิ้มฟันจิ้มลงไปในบราวนี่และดึงออกมา จะมีเนื้อบราวนี่ติดออกมานิดหน่อย 


  6. เมื่ออบเสร็จแล้ว นำออกมาและวางไว้ในถาดให้เย็นประมาณ 15 นาทีแล้วจึงนำออกมาจากถาดต่อไว้ให้เย็นอีกสัก 2 ถึง 3 ชั่วโมง เมื่อเย็นแล้ว ค่อยตัดแบ่งเป็นชิ้นๆ ของบัว บัวแบ่งได้ 12 ชิ้นค่ะ ถ้ายังไม่ทานเลยให้เก็บไว้ในภาชนะสูญญากาศและเก็นไว้ในตู้เย็น

ฟัดจ์บราวนี่เหมาะกับการทานตอนอุ่นๆ วิธีการอุ่นบราวนี่ที่เก็บไว้ในตู้เย็นนั้นง่ายมาก แค่นำเข้าเตาอบที่อุ่นเตรียมไว้แล้วที่ 150 องศาเพียง 2 ถึง 3 นาทีค่ะ คุณพ่อกับคุณแม่บัวชอบทานกับกาแฟดำหรือชาร้อน แต่ส่วนตัวแล้วบัวชอบทานกับไอศกรีมวานิลลาสักก้อน เพื่อนๆชอบทานฟัดจ์บราวนี่แบบไหนคะ 

จนกว่าจะถึงคราวหน้า ขอให้สนุกกับการทำอาหารค่ะ <3 <3 <3

* --- * ---- * ---- * --- * ---- * ---- * --- * ---- * ---- * --- * ---- * ---- *

Lately, I have been enjoying baking snacks and desserts for friends and loved ones. These Fudge Brownies have been requested by a few friends for this upcoming Saturday. I thought I should share this recipe with you guys. This recipe I adapted from Fudgy Brownies by non other than my fav YouTube Chef Laura Vitale and Best Cocoa Brownies by Smitten Kitchen. Here you things you will need.

  • 200 g Unsalted Butter, at room temperature 
  • 200 g Dark Chocolate, melted 
  • 250 g Sugar 
  • 75 ml Milk 
  • 2 Teaspoons of Vanilla Extract 
  • 1/4 Teaspoon of Salt 
  • 1/2 Teaspoon of Baking Powder 
  • 80 g Cocoa Powder 
  • 3 Large Eggs, Cold 
  • 1/2 Teaspoon of Instant Espresso Powder 
  • 70 g All Purpose Flour 
  • 80 g Walnuts 
  • 70 g White Chocolate Chips 
Once you have all the ingredients, follow these steps.
  1. Preheat your oven to 170 Celsius. Spray your pan or oven safe container you will bake your brownies in and line parchment paper. 
  2. Dry Mixture. In a bowl, lightly toss all purpose flour, cocoa powder, baking powder, salt and expresso powder together until they are some what mixed. Then set aside. 
  3. Wet Mixture. In a large bowl, beat unsalted butter and sugar together until fluffy. Then add eggs, vanilla extract and milk and mix until combines. Add melted chocolate and again mix until combine. Make sure your melted chocolate is not too hot, otherwise the eggs will be cooked. 
  4. Brownie Dough. Mix wet and dry mixtures together just so they are well combined. Do not over mix. Then add walnuts and white chocolate chips into the dough and use spactular to lightly mix everything again. 
  5. Pour brownie dough into your prepared pan and bake brownies for 45 minutes or until you insert a toothpick and it comes out with few wet crumbs. 
  6. Once baked, take out of the oven and let it cool in the pan for about 15 minutes. Then remove from the pan and let the brownies cool completely on the rack. Let the brownies cool down first before you cut them into pieces. The reason is that you would like to contain most of the moisture as long as possible. To save brownies for later days, place in airtight containers.
These brownies are best eaten when warm, so eat right away or warm them up in a preheated 150 Celsius oven for about 2 or 3 minutes. My parents love to have these brownies with black coffee or tea, but I prefer having them with vanilla icecream or whipped cream. Let me know how do you normally eat your brownies in the comment section below.

Until next time, stay full and stay happy. <3 <3 <3

Tuesday, 12 November 2013

Recipe Talk: Pasta Aglio e Oilio with Prawns

ประมาณสองสามวันที่แล้ว เพื่อนสนิทบัวคนนึงที่ตอนนี้ได้ลัดฟ้าไปอยู่ถึงนิวยอร์คได้รีเควสอาหารสูตรพาสต้าที่ไม่มีครีม ไม่ใส่ผักชิ้นใหญ่ๆ และก็ต้องทำได้ง่าย คิดไปคิดมาก็ได้มาจบลงที่สูตร "พาสต้ากระเทียมและกุ้ง" จริงๆแล้วพาสต้า Aglio e Oilio แปลจากภาษาอิตาเลี่ยนได้ประมาณว่า พาสต้ากระเทียมและน้ำมันมะกอก เพราะฉะนั้นสิ่งที่ขาดไม่ได้เลยในพาสต้าชนิดนี้ก็จะเป็นกระเทียมและน้ำมันมะกอก แต่ละคนก็จะมีสูตรที่แตกต่างกัน บ้างก็จะแค่มีส่วนผสมสองอย่างนี้ บ้างก็จะเพิ่มพริกป่นหลากหลายชนิดและเนื้อสัตว์ชนิดต่างๆ สูตรที่บัวนำเสนอวันนี้ ได้ถูกปรับมาจากสูตร Spaghetti Aglio e Oilio ของเชฟโปรดของบัว เชฟ Laura Vitale ถ้าพร้อมแล้ว เรามาดูส่วนผสมกันค่ะ


  • น้ำมันมะกอก 8 ช้อนโต๊ะ
  • กระเทียมหั่นบาง 35 กรัม
  • ถั่วไพน์นัท 100 กรัม
  • ชีสพาเมซานขูด 50 กรัม
  • พาสลี่ย์สับ (บัวใช้แบบแห้ง เพราะหาแบบสดแถวๆบ้านไม่ได้) 2 ช้อนโต๊ะ
  • เส้นเฟตตูชินี่แห้ง 250 กรัม
  • พริกคาเยน 1 ช้อนชา (หรือพริกป่นธรรมดาก็ได้ แต่อาจจะลดปริมาณลงเหลือสัก 1/4 ช้อนชา)
เมื่อมีส่วนผสมครบแล้ว เรามาเริ่มกันเลยค่ะ

  1. ต้มน้ำในหมอใบใหญ่ให้เดือด ใส่เกลือประมาณ 1 ช้อนโต๊ะ เมื่อน้ำเดือดแล้ว ให้ใส่เส้นพาสต้าที่ชอบลงไป ต้มประมาณ 8 นาที หรือตามที่ข้างกล่องบอก
  2. ระหว่างต้มพาสต้า เพื่อนๆก็ใส่น้ำมันมะกอกกับกระเทียมลงไปในกระทะ ผัดให้กระเทียมสีทองสวยงาม


    จากนั้นใส่พริกคาเยนและถั่วไพน์นัทลงไป ผัดต่อจนถั่วมีสีน้ำตาลทอง จากนั้นยกลงจากไฟและพักไว้
  3. เมื่อพาสต้าสุกก็เทน้ำออก ใส่ส่วนผสมในข้อ 2 ลงไปและคลุกเคล้าให้ทั่ว 
  4. เสริฟบนจาน และโรยพาเมซานชีสประมาณ 1 ช้อนโต๊ะบนหน้าพาสต้า จากนั้นก็ทานให้อร่อย

สูตรนี้ทั้งง่ายและอร่อย รับรองว่าต้องรักอาหารจานนี้อย่างแน่นอนค่ะ ถ้าใครลองทำแล้วมีข้อแนะนำหรือติชม ก็บอกบัวได้ทางด้านล่างโพสนี้ได้เลยค่ะ ^____^

จนกว่าจะถึงคราวหน้า ขอให้สนุกกับการทำอาหารนะคะ  <3 <3 <3

* --- * --- * --- * --- * --- * --- * --- * --- * --- * --- * --- * --- *

A few days ago, a very good friend of mine requested a pasta recipe that is not creamy, no chunky veggies and easy to make. I have just the recipe for him... "Pasta Aglio e Olio with Prawns". 


The recipe is adapted from Spaghetti Aglio e Olio by my favorite Laura Vitale, and yields 4 servings. If you are ready, here are the things you will need. 
  • 8 Tablespoons of Olive Oil 
  • 35 g Garlic (sliced thinly)
  • 100 g Pine Nuts
  • 50 g Grated Parmesan Cheese
  • 2 Tablespoons of Chopped Parsley (I used dried ones because I couldn't find fresh parsley near home.)
  • 250 g Fettucinne (or any string pasta you like).
  • 1 Teaspoon of Cayenne Pepper 
Once you have everything, here is how you make your pasta aglio e olio.
  1. Cook pasta by boiling water and adding generous amount of salt. I normally go by 1 tablespoon. Bring your salted water to boil and then add pasta for 8 minutes or per instruction on the package.
  2. In a large pan, heat olive oil and garlic until golden (Laura Vitale's recipe suggests 5 minutes). Then add pine nuts and cayenne pepper, and continue to cook until pine nuts are golden brown. Set aside.
  3. Once the pasta is cooked and drained, add in the garlic oil mixture and toss until pasta strings are all covered with the mixture. 
  4. Put on plates and sprinkle a tablespoon or more of grated parmesan cheese on top of each plate. Then you are ready to enjoy your pasta! 
Give this pasta recipe a go. You will fall in love. Such a satisfying and delicious dinner. Any comment and suggestion, let me know below. ^____^

Until next time, stay full and stay happy. <3 <3 <3 

Sunday, 10 November 2013

Recipe Talk: Apple Pie Overnight Oatmeal

สวัสดีค่า วันนี้บัวเอาสูตรโอ๊ตมีลมาฝากกันอีกแล้ว ขอเรียกสูตรนี้ว่า "โอ๊ตมีลพายแอปเปิ้ล" รสชาติคล้ายคลึงกับไส้พายแอปเปิ้ลค่ะ สูตรนี้ทั้งง่าย ทำได้อย่างรวดเร็ว และทำข้ามคืนไว้ทานตอนเช้าได้ค่ะ ส่วนตัวแล้วบัวจะทำทีไว้หลายๆกล่องค่ะ เก็บไว้ในตู้เย็นแล้วค่อยๆเอาออกมาทานทีละกล่องตอนเช้า ถ้าใครสนใจ ด้านล่างเป็นสิ่งที่เพื่อนๆต้องเตรียมไว้สำหรับการทำโอ๊ตมีลพายแอปเปิ้ล 1 ที่ค่ะ

  • แอปเปิ้ล (หั่นแบบลูกเต๋าหรือจะแค่หั่นเป็นชิ้นเล็กก็ได้ค่ะ) 70 กรัม ... ถ้าไม่สะดวก ก็ใช้ทั้งลูกเลยก็ได้ค่ะ แต่เอาแบบลูกเล็กหน่อย
  • โอ๊ตมึล 20 กรัม
  • ถั่วพีแคน (หั่นครึ่ง) 10 กรัม
  • อบเชยป่น 1 ช้อนชา
  • ขิงป่น 1/4 ช้อนชา
  • เกลือ 1/8 ช้อนชา
  • เม็ดแมงลัก 1 ช้อนโต๊ะ
  • วานิลลาสกัด 1 ช้อนชา
  • น้ำเชื่อมเมเปิ้ล 1 ช้อนโต๊ะ
  • นมอัลมอนด์ (หรือนมชนิดใดก็ได้ตามความชอบ) 150 มิลลิลิตร... ถ้าไม่ชอบให้โอ็ตมีลเหนียวมากก็เพิ่มนมได้ตามใจชอบค่ะ
  • ซอสแอปเปิ้ล 60 กรัม
เมื่อมีทุกอย่างพร้อมแล้ว ก็เพียงแค่ผสมทุกอย่างเข้าด้วยกันและก็เอาเข้าไมโครเวฟสัก 45 วินาที แต่ถ้าใครไม่ชอบใช้ไมโครเวฟ ก็แค่เปลี่ยนไปอุ่นในหม้อบนไฟกลางประมาณ 2 - 3 นาทีค่ะ ก่อนนำเข้าภาชนะสูญญากาศ รอให้โอ๊ตมีลเย็นตัวแล้วจึงเก็บไว้ในภาชนะและในตู้เย็น เพียงแค่นี้ตอนเช้าก็ไม่ต้องวุ่นวายทำอะไรมาก แค่เปิดภาชนะและทานได้เลย


จนกว่าจะถึงคราวหน้า ขอให้สนุกกับการทำอาหารนะคะ <3 <3 <3

* --- * --- * --- * --- * --- * --- * --- * --- * --- * --- * --- * --- * 

To add to the list of my overnight oatmeal recipes, here is Apple Pie Overnight Oatmeal. Simple, easy and can be prepared prior to the busy mornings. Personally, I normally make 4 or 5 servings in a roll because it is faster for me in the morning as I can just grab and go run my errands. 


If you are interested, here are the ingredients you need for 1 serving.
  • 70 g Apple (Chopped or Diced... I did freestyle chopping... Lol)
  • 20 g Oat
  • 10 g Pecan (Halved)
  • 1 Teaspoon of Gound Cinnamon
  • 1/4 Teaspoon of Ground Ginger
  • 1/8 Teaspoon of Salt
  • 1 Teaspoon of Sweet Basil Seeds or Chai Seeds 
  • 1 Teaspoon of Vanilla Extract
  • 1 Tablespoon of Maple Syrup
  • 150 ml Almond Milk (or milk of your choice)
  • 60 g Applesauce 
Once you have everything, simply stir them up together and microwave for around 45 seconds. However, you are not happy using microwave, just stir everyting together in a pot over medium heat for a few minutes. Before you put in airtight containers, make sure your oatmeal is cooled. Store in a refridgerator and enjoy in the morning. 

Until next time, stay full and stay happy. <3 <3 <3

Wednesday, 6 November 2013

Quiet Moments @ Shoten Sushi

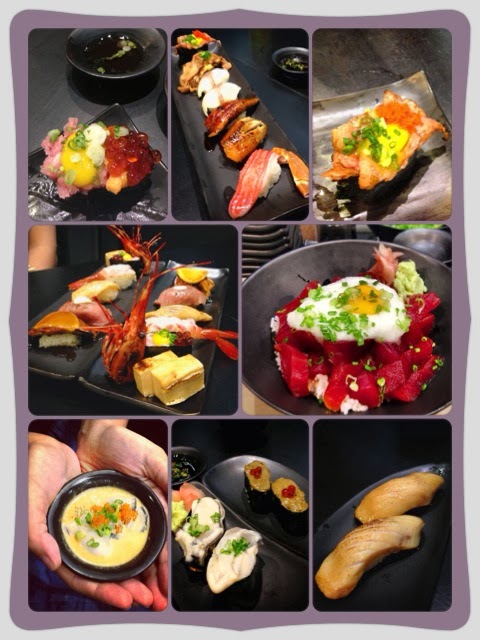
ถ้าใครถามบัวว่าไปร้านซูชิไหนบ่อยสุดในกรุงเทพฯ บัวคงต้องตอบว่าเป็นร้าน Shoten Sushi เพราะว่าร้านมีขนาดกระทัดรัด มีโต๊ะแค่เพียง 2 - 3 โต๊ะและมีที่นั่งด้านเค้าเตอร์ประมาณ 7 ที่ และเพราะว่าบัวชอบที่บัวสามารถมีเวลาส่วนตัวเงียบๆที่จะดื่มดำกับรสชาติอาหารได้แบบไม่ต้องมีใครหรือเสียงอะไรมารบกวน สนใจบรรยากาศแบบนี้ไหมคะ ถ้าสนใจร้าน Shoten Sushi อยู่ใกล้กับสถานี BTS สนามเป้ามาก อยู่ระหว่างทางออก 2 และ 4 ค่ะ ไปด้วย BTS จะง่ายกว่าเพราะไม่ต้องวุ่นวายกับเรื่องที่จอดรถ เพราะที่จอดมีจำกัด ถ้าจะไปกับเพื่อนหลายๆคน แนะนำให้โทรไปจองโต๊ะก่อนนะคะ (เบอร์ 091-428-2456) ภาพที่บัวลงต่อไปนี้เป็นสิ่งบัวสั่งอยู่เกือบทุกครั้งที่ไป อาจจะจำนวนน้อยลงบ้าง แต่เป็นซูชิที่บัวสั่งบ่อยๆค่ะ อ่อ! ต้องบอกก่อนว่ารูปด้านล่างนี้ถ่ายคนละเวลากัน พร้อมแล้วไปดูกันเลย

If I have to tell you which sushi bar I go to most often in Bangkok, I would say Shoten Sushi. I like the size of the place, a few tables and about 7 seats at the counter, allowing me to have quiet moments while enjoying my sushi. Interested? Shoten Sushi is located very close to BTS Sanam Pao station between exit 2 and 4. I find taking BTS is the best way to go there as the parking is limited. If you are going in a big group, I suggest calling them first (at 091-428-2456) to reserve a table. If you are ready, here are some of the sushi I love! Please note that these pictures below were taken at different times. If you are ready, here we go! 

Top: Shoten Sushi (Left), Customized Sushi Set (Middle), Buta-ko (Right)
Middle: Sets (Left), Akami Don (Right)
Bottom: Oyster in Sauce (Left), Oyster Sushi & Kani Miso Sushi (Middle), Gindara Sushi (Right)

Top: Sanma Sushi (Left), Akami Tataki Sushi (Middle), Mentaiko Sushi (Right)
Middle: Canadian Lobster (Left), Canadian Lobster Sashimi (Right)
Bottom: Butter Canadian Lobster (Left),  Enormous Anago Sushi (Middle), Green Tea Icecream (Left) 
Slightly Torched Matsuzaka Sushi

นอกเหนือจากที่อยู่ในรูปภาพแล้ว สิ่งที่บัวชอบมากของที่นี้คือ ซูชิตับห่านที่มาพร้อมกับมะม่วงชิ้นเล็กๆและซอสหวาน เป็นเมนูที่บัวไม่เคยพลาดเลยสักครั้ง อ้อ! ที่ลืมบอกไม่ได้คือซูชิมันปูมาพร้อมกลิ่นเลมอนอ่อนๆที่ทำให้รสชาติและกลิ่นที่แรงของมันปูกลายเป็นกลมกล่อมและหอมละมุน แนะนำให้ทานเป็นคำท้ายๆ กลิ่นจะได้ไม่ไปกลบซูชิหรืออาหารอย่างอื่นค่ะ ถ้าเพื่อนๆตัดสินใจไปทานที่ร้าน Shoten Sushi แล้วละก็ ลองทักทายหุ้นส่วนเจ้าของร้านดูและถามว่ามีอะไรพิเศษให้ลองบ้างรึเปล่า บ้างทีเพื่อนๆอาจจะได้ทานอาหารอร่อยที่ไม่มีอยู่ในเมนูก็เป็นได้ค่ะ 

Apart from those in the pictures, I totally love Foie Gras Sushi with a slice of mango and sweet sauce. They are always in my order whenever I drop by Shoten. Kani Miso sushi her is different. You get a little hint of lemon which brings out the round but yet sharp aroma of Kani Miso. Give these a go if you decided to drop by Shoten Sushi. If you feel a bit advanturous, ask the owner the specials of the day and you will be on a small food advanture.  


Akami Don in making

เรื่องราคาโดยรวมของร้านจะอยู่ประมาณกลางๆ แต่บิลของแต่ละมื้อก็ขึ้นอยู่กับว่าเพื่อนๆสั่งอะไรทานค่ะ บริการเป็นกันเอง บรรยากาศไม่วุ่นวาย เหมาะกับการมากับเพื่อนจำนวนไม่มากไว้สังสรรค์ และการคุยธุรกิจค่ะ คราวหน้าถ้าอยากทานซูชิ ลองแวะไปที่ Shoten Sushi ดูนะคะ 

About the overall price, I would say it is about mid range. However, the total bill depends on the dishes you order as well. Shoten Sushi, like I mentioned earlier, is not a busy restaurant, but rather a place where you can find peace. Great for small gatherings and business talk. Even if you fancy a slightly private dinner with your loved ones, this is a good place as well. So... Next time you feel like going for sushi, give Shoten Sushi a try. Let me know what you think down below.  

จนกว่าจะถึงคราวหน้า stay full and stay happy <3 <3 <3

Until next time, stay full and stay happy. <3 <3 <3

Tuesday, 5 November 2013

Recipe Talk: Crunchy M&M Cookies

หลังจากห่างหายจากการบล็อกไปมากกว่า 1 อาทิตย์ บัวกลับมาพร้อมกับสูตรคุกกี้แบบกรอบที่มีส่วนผสมของช็อกโกแลตเม็ดกระดุมที่คนไทยคุ้นเคยกันดี เจ้าคุกกี้นี้เรียกว่า "คุกกี้เอ็มแอนด์เอ็ม


โดยส่วนตัวแล้ว บัวเป็นคนชอบคุกกี้นิ่ม แต่ว่าสูตรนี้อร่อย กรอบ และหอมมากเกินกว่าที่จะไม่มาแชร์กับเพื่อนๆ สูตรนี้ปรับมาจากสูตร M&M Cookies ของเชฟสุดโปรดของบัว Laura Vitale ถ้าพร้อมแล้ว ด้านล่างนี้เป็นสิ่งที่เพื่อนๆต้องใช้ในการทำคุกกี้ค่ะ

  • แป้งอเนกประสงค์ 220 กรัม
  • เกลือ 1 ช้อนชา
  • เบกกิ้งโซดา 1 1/2 ช้อนชา
  • ไข่ 1 ใบ
  • วานิลลาสกัด 2 ช้อนชา
  • เนยจืด 225 กรัม (ทิ้งไว้ที่อุณหภูมิห้อง)
  • น้ำตาล 115 กรัม
  • น้ำตาลทรายแดง 110 กรัม
  • เอ็มแอนด์เอ็ม ชนิดนม 300 กรัม

ถ้ามีทุกอย่างครบแล้ว เรามาเริ่มกันเลยค่ะ

  • เหมือนเคย อุ่นเตาอบไว้ที่ 190 องศา และวางกระดาษสำหรับอบขนมไว้บนถาดอบขนม
  • เริ่มผสมส่วนผสมแห้ง โดยคลุกเคล้าแป้งอเนกประสงค์ เกลือ และเบกกิ้งโซดาเข้าด้วยกัน
  • ตีเนย น้ำตาล และน้ำตาลทรายแดงเข้าด้วยกันจนฟู แล้วค่อยใส่ไข่และวานิลลาสกัดเข้าไปผสม ตีต่ออีกประมาณ 1 นาทีหรือจนส่วนผสมเปียกเนียน
  • นำส่วนผสมแห้ง ส่วนผสมเปียก และเอ็มแอนด์เอ็มมาผสมพอให้เข้ากันดูเป็นเนื้อเดียว เพียงเท่านี้เพื่อนๆก็จะได้คุกกี้โดว์ไว้อบแล้ว สามาระเก็บไว้ในตู้เย็นแล้วค่อยๆอบที่ละน้อยก็ได้ค่ะ * ระวัง * ถ้าไม่อยากทานคุกกี้แบบแข็งและเหนียว ก็พยายามอย่าผสมในขั้นตอนนี้มากจนเกินไป
  • ใช้ที่ตักไอศกรีมหรือช้อนแบ่งคุกกี้โดว์ให้เท่าๆกันไว้บนถาดอบ 
  • การอบเราต้องอบ 2 ครั้งด้วยกัน ครั้งแรกเพื่อให้คุกกี้สุดและพองตัว ครั้งที่สองเพื่อไล่ความชื่นออกจากคุกกี้เพื่อที่เราจะได้คุกกี้กรอบ ถ้าใครชอบแบบนิ่มก็อบเพียงครั้งเดียว * ครั้งที่ 1 * อบที่อุณหภูมิ 190 องศา เป็นเวลา 11 นาที หลังจากนั้นนำออกจากเตาอบและทิ้งให้เย็น * ครั้งที่ 2 * อบที่อุณหภูมื 150 องศา เป็นเวลา 10 นาที 
  • หลังจากการอบแล้ว ทิ้งคุกกี้ให้เย็นก่อนนำเข้าเก็บในกล่องสูญญากาศ คุกกี้สามารถอยู่ได้ถึง 5 วันหรืออาจจะนานกว่านั้นขึ้นอยู่กับวิธีการเก็บค่ะ

สูตรนี้จะสามาระทำคุกกี้ออกมาได้ถึง 2 โหลด้วยกัน แต่จำนวนชิ้นก็ขึ้นอยู่กับขนาดของคุกกี้ค่ะ ใครที่ลองทำสูตรนี้แล้ว มีข้อเสนอแนะหรือติชมยังไงก็บอกกันได้ทางด้านล่างนี้นะคะ

จนกว่าจะถึงคราวหน้า ขอให้สนุกกับการทำอาหารค่ะ <3 <3 <3

* --- * --- * --- * --- * --- * --- * --- * --- * --- * --- * --- * --- *

This recipe is for all you crunchy cookie lovers. Although I personally prefer soft and gooey cookies, this M&M cookies recipe is one of the exceptions. 


This M&M cookies recipe is adapted from M&M Cookies by Laura Vitale, my all time favorite YouTube chef. If you are ready, here are things you need. 
  • 220 g All Purpose Flour
  • 1 Teaspoon of Salt
  • 1 1/2 Teaspoon of Baking Soda
  • 1 Egg
  • 2 Teaspoons of Vanilla Extract
  • 225 g Unsalted Butter (at room temperature)
  • 115 g Sugar
  • 110 g Brown Sugar
  • 300 g Milk Chocolate M&M
Once you have everything, let's get started.
  • Preheat oven to 190 Celsius. Line your baking tray with parchment paper.
  • Dry Mixture. Add together all purpose flour, salt and baking soda together.
  • Wet Mixture. Cream sugar and unsalted butter together until fluffy. Then add egg, vanilla extract, sugar and brown sugar and mix until smooth.
  • Cookie Dough. Pour the dry mixture and M&M into the wet mixture and stir until everything is combined. * Note * Do not over work the flour by over mixing the cookie dough. Otherwise you will end up with tough cookies.
  • Use an ice-cream scoop to evenly distribute the cookies dough in each cookie. Then bake your bookies for 11 minutes. * Note * If you would like crunchy cookies, after the first bake, let the cookies cool down completely and then bake again at 150 Celsius for another 10 minutes.
With this recipe, I get 24 M&M cookies, but the number of cookies depends on how big or small they are. They are great with a glass of milk to give you that little sugar kick to keep you going. Give the recipe a try and let me know what you think down below. 

Until next time, stay full and stay happy. <3 <3 <3

Sunday, 27 October 2013

Recipe Talk: Pumpkin Swirl Blondie

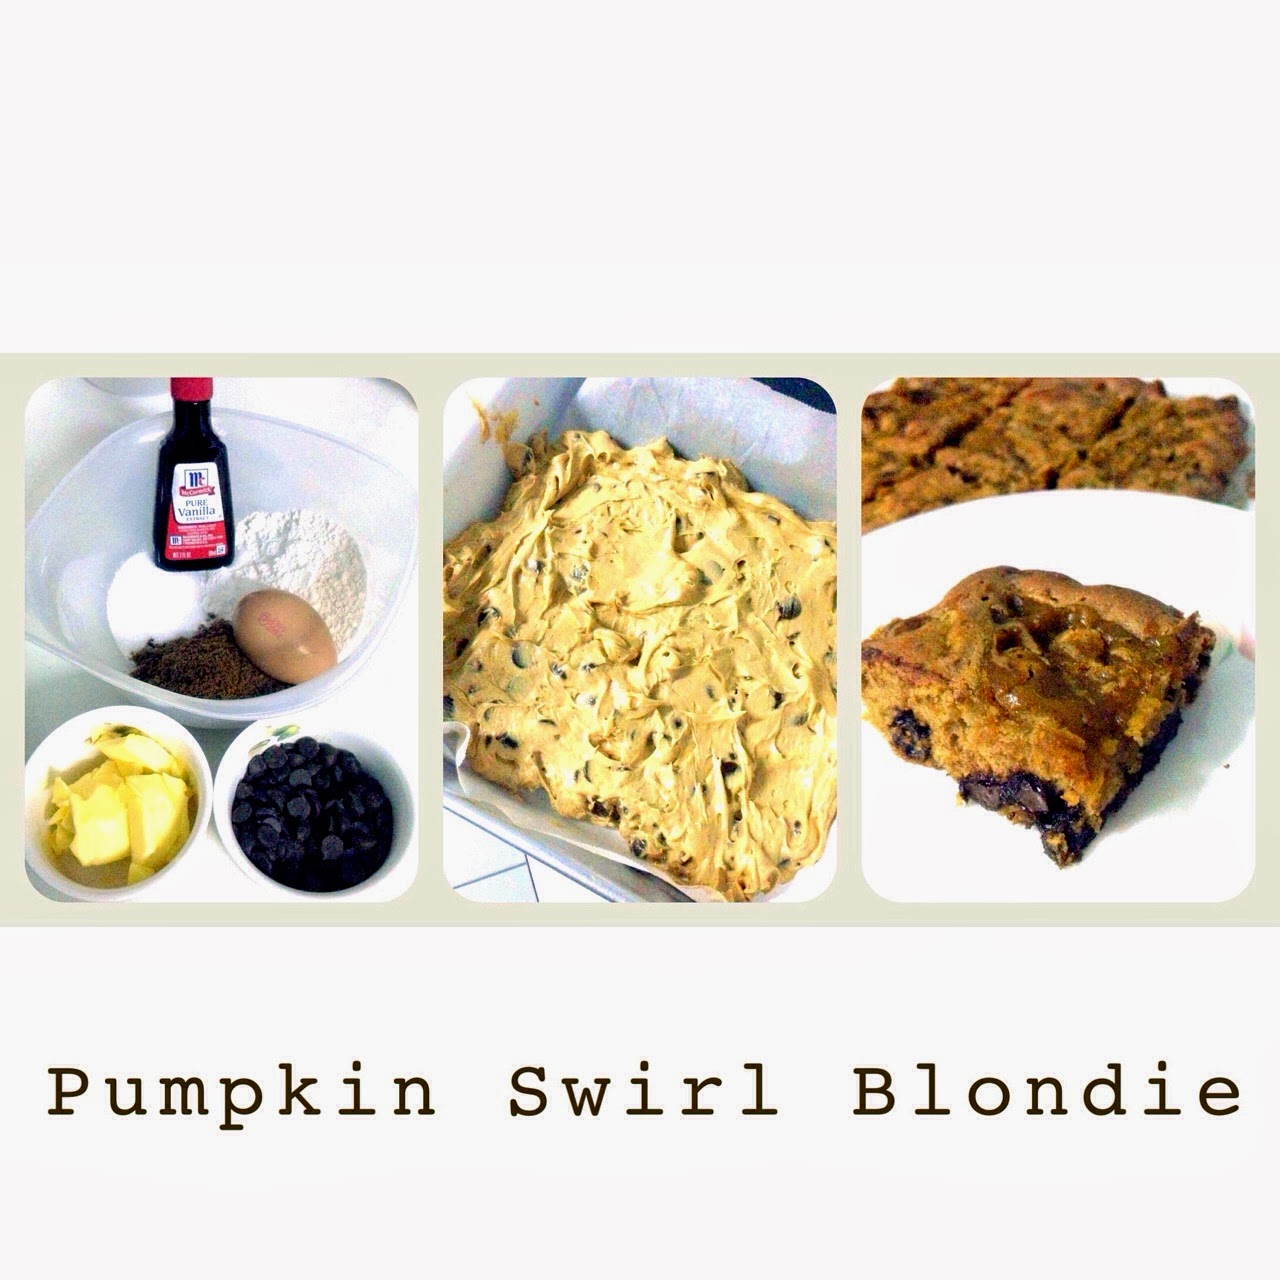
ใครชอบทานบราวนี่ ก็คงจะรู้จักกับบลอนดี้ดี บลอนดี้ก็คือบราวนี่ที่ไม่ใส่ช็อกโกแลตหรือโกโก้ลงไปในตัวเนื้อเค้กนั้นเอง ใครสนใจก็สามารถอ่านเรื่องบราวนี่และบลอนดี้ ก็คลิ๊กไปอ่าน "บราวนี่ กับ บลอนดี้ (Brownie & Blondie) ความอร่อยของขนมเนื้อแน่น..นุ่มและชุ่มชื้น" ได้เลยค่ะ แต่วันนี้บัวอยากจะนำเสนอสูตร "บลอนดี้ฟักทอง (Pumpkin Swirl Blondies)" ของ Laura Vitale สูตรนี้ทั้งอร่อยและง่ายมาก ระหว่างการอบบลอนดี้นั้น ห้องครัวจะคลุ้งไปด้วยกลิ่นที่ทั้งหวานและอบอุ่น


บัวปรับจำนวนและอัตราส่วนในสูตรนิดหน่อยเพราะบัวอยากจะทำบลอนดี้ออกมาไม่เยอะมาเหมือนในสูตรของ Laura Vitale บัวหารครึ่งอัตราส่วนในสูตรเดิมค่ะ ถ้าพร้อมแล้วมาดูอัตราส่วนส่วนที่บัวปรับกันเลยนะคะ อัตราส่วนบัวปรับให้อยู่ในรูปแบบน้ำหนักแทนที่จะบอกเป็นถ้วยตวง สูตรนี้ทำได้ 6 ชิ้น

สำหรับเนื้อบลอนดี้

  • แป้งอเนกประสงค์ 60 กรัม
  • ผงฟู 1/2 ช้อนชา
  • เกลือ 1/8 ช้อนชา
  • น้ำตาลทรายแดง 50 กรัม
  • น้ำตาล 28 กรัม
  • เนยจืด (ปล่อยให้อยู่ในอุณหภูมิห้อง) 60 กรัม
  • วานิลลาสกัด 1/2 ช้อนชา
  • ช็อกโกแลตชิพ 88 กรัม

สำหรับฟักทอง
  • ฟักทองบดละเอียด 80 กรัม
  • น้ำตาล 20 กรัม
  • เครื่องเทศพายฟักทอง 1/2 ช้อนชา
สำหรับวิธีทำ ไปดูที่ Pumpkin Swirl Blondies ได้เลยค่ะ Laura Vitale มีคลิปยูทูปบอกวิธีการทำอยู่ในโพสนี้ของเค้าด้วย ทำง่ายและใช้เวลาไม่นานค่ะ เอาไว้ทานเป็นอาหารเช้าหรืออาหารทานเล่นก็ได้ค่ะ 

จนกว่าจะถึงคราวหน้า ขอให้มีความสุขกับการทำอาหารค่ะ <3 <3 <3

* --- * --- * --- * --- * --- * --- * --- * --- * --- * --- * --- * --- *

Today I would like to introduce you to Laura Vitale's Pumpkin Swirl Blondies as a part of the Pumpkin Recipe Series. Her recipe is insanely delicious and super easy to bake. I personally guarantee that this recipe will make your kitchen smells divine!


However, instead of white chocolate chips, I used semi-sweet chocolate chips that I usually have in my storage. Also instead of making the whole batch which yields 16 squares, I just ended up dividing everything in half because I would not be able to finish the whole 16 blondie suqares all by myself. The following recipe is half of Laura Vitale's recipe and converted to the metric measurement. If you are ready, here we go.

Make 6 Squares

For the Blondie Base:
  • 60 g All Purpose Flour
  • 1/2 Teaspoon of Baking Powder 
  • 1/8 Teaspoon of Salt
  • 50 g Brown Sugar
  • 28 g Sugar
  • 60 g Unsalted Butter, at room temperature
  • 1/2 Teaspoon of Vanilla Extract
  • 1 Egg
  • 88 g Chocolate Chips
For the Pumpkin Swirl:
  • 80 g Pumpkin Puree
  • 20 g Granulated Sugar
  • 1/2 Teaspoon of Pumpkin Pie Spice
For the instruction, just head to Laura Vitale's Pumpkin Swirl Blondies. She has a video to instruct you on how to bake these blondies. These blondies are perfect for breakfast or afternoon snack. 

Until next time, stay full and stay happy. <3 <3 <3

Saturday, 26 October 2013

Recipe Talk: Pumpkin Overnight Oatmeal

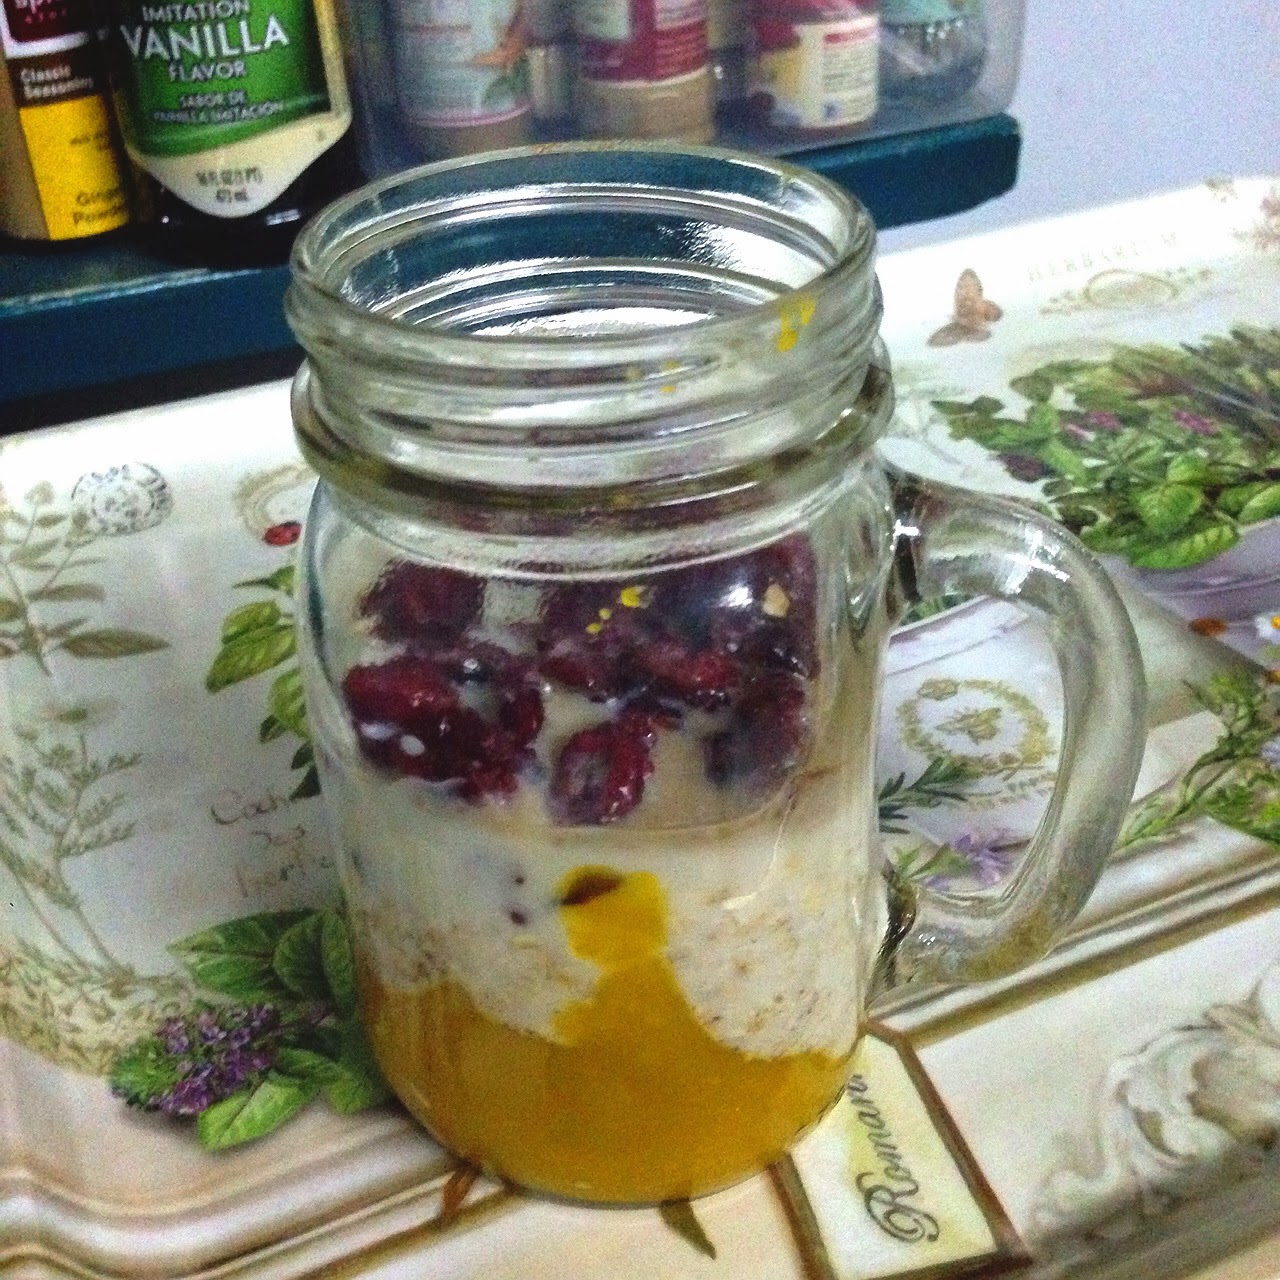
สวัสดีค่ะ บัวกลับมาแล้วพร้อมกับสูตรที่ 3 ในซีรีย์สูตรอาหารจากฟักทอง บัวขอเรียกสูตรนี้ว่า "โอ๊ตมีลฟักทอง" 


สูตรนี้สามารถทำได้ในระยะเวลาอันสั้นและสามารถเตรียมไว้ล่วงหน้าเพื่อทานเป็นอาหารเช้าได้ ใช้เวลาไม่ถึง 15 นาที สูตรนี้เป็นสูตรสำหรับมื้อเดียวและคนเดียวทาน ถ้าเพื่อนๆต้องการทำเพื่อจำนวนคนหรือจำนวนมื้อที่มากกว่าหนึ่งคนหรือหนึ่งมื้อ ก็แค่คูณจำนวนคนหรือมื้อไปในแต่ละส่วนผสม โอ๊ตมีลฟักทองนี้ให้พลังงานแค่ 315 แคลอรี่แต่ทำให้อิ่มไปได้จนเที่ยง น่าสนใจใช่ไหมคะ พร้อมแล้วเรามาดูกันว่าเพื่อนๆต้องใช้อะไรบ้าง


  • โอ๊ตมึล 35 กรัม
  • ฟักทองบดละเอียด 125 กรัม
  • นมถั่วเหลือง (หรือนมชนิดใดก็ได้ที่เพื่อนๆชอบ) 100 มิลลิลิตร
  • แครนเบอร์รี่อบแห้ง 40 กรัม
  • เครื่องเทศพายฟักทอง 1 ช้อนชา
  • รสวานิลลา 1 ช้อนชา


วีธีทำก็ง่ายนิดเดียว เพียงแค่ผสมทุกอย่างเข้าด้วยกันและเก็บไว้ในตู้เย็นข้ามคืน (ในกรณีทำไว้สำหรับทานหลายๆ ก็สามารถเก็บไว้ได้หลายคืน ^___^ ) ตอนเช้าก็เพียงแค่เอาช้อนออกมาและมีความสุขกับอาหารเช้าเพื่อสุขภาพแสนอร่อยได้ 

จนกว่าจะถึงคราวหน้า ขอให้สนุกกับการทำอาหารค่ะ <3 <3 <3 


* --- * --- * --- * --- * --- * --- * --- * --- * --- * --- * --- * --- *


What do you usually have for breakfast? For me, apart from fruity green smoothies and eggs, I usually go for overnight oatmeal. Overnight oatmeal breakfasts could be made a week in advance so you can just grab your oatmeal to go. It is easy and does not take more than 15 minutes to prepare. 


Now I have just the overnight oatmeal recipe that fits right into the Pumpkin Recipe Series. I would like to call this recipe "Pumpkin Overnight Oatmeal". This recipe yields just one serving so if you would like to prepare for the rest of your week, simply multiply the number of servings you want to the ingredients you need. Also this recipe only gives you 315 calories, but fills your stomach until lunch time. If you are ready, here are ingredients you need.


  • 35 g Oatmeal
  • 125 g Pumpkin Puree
  • 100 ml Soy Milk (or you can just use milk)
  • 40 g Dried Cranberries
  • 1 Teaspoon of Pumpkin Pie Spice
  • 1 Teaspoon of Vanilla Flavor


One you have everything, just mix everything together and store in a container in the fridge for a night or longer if you want. In the morning, just simply take out your spoon and enjoy your oatmeal. 

Until next time, stay full and stay happy. <3 <3 <3